
After finishing off Selections and Masking in the last post, we are now moving onto using Smart Objects.
If you’d like to see the rest of this tutorial series, you can do so here.
In today’s lesson we will be using the following assets:

Part of this tutorial talks about vector files and Adobe Illustrator because the icon file you see above of the “F” is made in Adobe Illustrator. You will be incorporating this icon into your flyer to make a “hero graphic” in the background.
You don’t need to use Adobe Illustrator if you don’t have access to it or you don’t know how to use it. That’s perfectly fine, the assets are all provided for you including the illustrator file above. You will start off with this asset first:
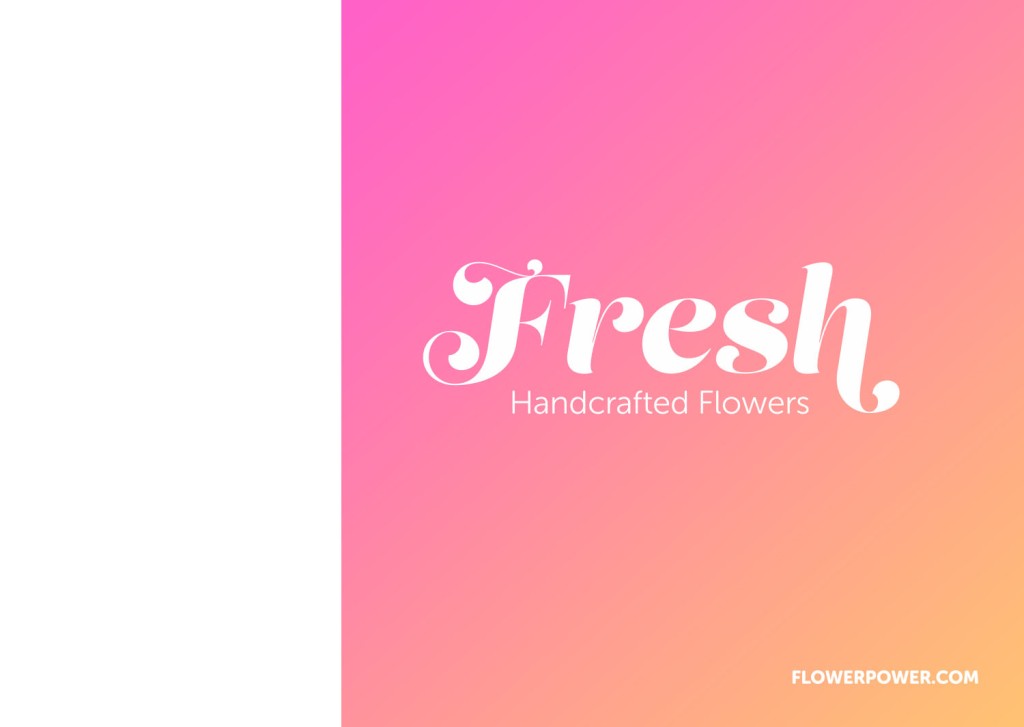
Once you open this up in Photoshop, we will then add the flower asset above – use our scaling skills and tools to scale it to the correct size so that it sits at the bottom of our layers. You can position it however you want but I would just copy the tutor. Now, this is where the magic happens. If you scaled it down using the transform tool, you will notice that the quality of the image is terrible. That is because we scaled it using transform and we didn’t make the image a smart object first. If you make an image a smart object, it retains all of the image’s quality so you can resize and transform as much as you want and never lose the quality of your image.
Using smart objects, make your image a smart object, scale it correctly to sit under your layers and then add the icon above. We want to copy that into our image, add a white overlay on normal setting by right clicking on the logo. Then make a duplicate because we want a smaller version of the logo for this image as well. Then you want to adjust the opacity so that it fades into the background like a watermark. Make it a smart object and then you can scale it around so that it looks similar to this when you’re done:

Can you see how we used the logo in two places to make this flyer really stand out?
And that’s all there is to it! Smart objects in Photoshop are so easy to use and it really is a wonderful tool for scaling objects and retaining the image quality.
Please let me know if you’re following this tutorial series or if you have any comments or questions about any of the art on this blog. I’d be keen to discuss with you!
Until tomorrow, stay safe out there, keep creating and I’ll catch you in the next post!

Now this is real value. I’ve worked with designers at my day job, and I have no idea what the hell they’re doing with all their illustration software. And here you are teaching real technical stuff for even people like me to understand. Awesome post. Thanks for this, Julie!
LikeLiked by 2 people
Ah lhey there Stuart 🙂 Thank you for the kind words 🙂 I started my “tutorial review” posts some time back but people seem to enjoy them so I continued doing them. It’s so true about bringing value to your readers – I try to keep that in mind when I write now 😀 Stay safe my friend, and I look forward to your next post 🙂
LikeLiked by 1 person
Smart objects that’s a new one to me. Will have to fire up a windows machine and acquire a newer version of Photoshop, the last of the pre conscription versions.
LikeLiked by 2 people
Hey there again 🙂 Yes you should when you get some time! Maybe we could collaborate on something 😀
LikeLiked by 1 person
[…] finishing off Smart Objects in the last post, we are now moving onto using Transform and Wrap and getting very close to the end of this […]
LikeLike